Using Jupyter notebooks on ADA#
Jupyter notebooks are a convinient way to test/share python code for various development work.
There are majorly two ways in which jupyter notebooks can be run on ADA.
The requirement for both of them is that they .ipynb file be copied onto one of your directory inside your home directory, along with the data/csv file that the notebook may use.
The two methods are,
Using OpenOnDemand
Using an interactive session.
Using OpenOnDemand#
As mentioned before copy the jupyter notebook onto one of your home directories on ADA.
Before opening OpenOnDemand, create your required environement at your home login first. In this example we create juptest environment.
Load the anaconda module.
module load anaconda-uoneasy/2023.02.6
See the usual method to create a conda environement here Create a conda env.
3. Make sure all the necessary packages that the jupyter-notebook will use are installed in this environment and is done within the login node itself. This is because the compute nodes will not have internet access, and hence a pip instlal or a conda install will not work.
Additionally, it is important to also install the jupyter specific packages. Namely jupyter.
This can be done by
# Inside an activated environement that will contain all the packages required by the jupyter-notebook.
conda install jupyter
4. After installing all the packages, open OpenOnDemand form here, OpenOnDemand Webpage
Once OpenOnDemand page opens up, go to Interactive sessions -> VNC desktop sessions

One can now book the appropriate resource for the jupyter-notebook code to use, based on following
Set the number of hours for which you want to book the resource.
Set the number of cores for your job. (Note that this is on defq or hmemq partitions, which mean each node has a maximum of 96 cores.)
Set the amount of memory required for your job. (The thumb rule for setting the memory atleast for the defq is 4 times the number of cores. For hmemq this can be higher.)
Set the partition (either defq or hmemq).
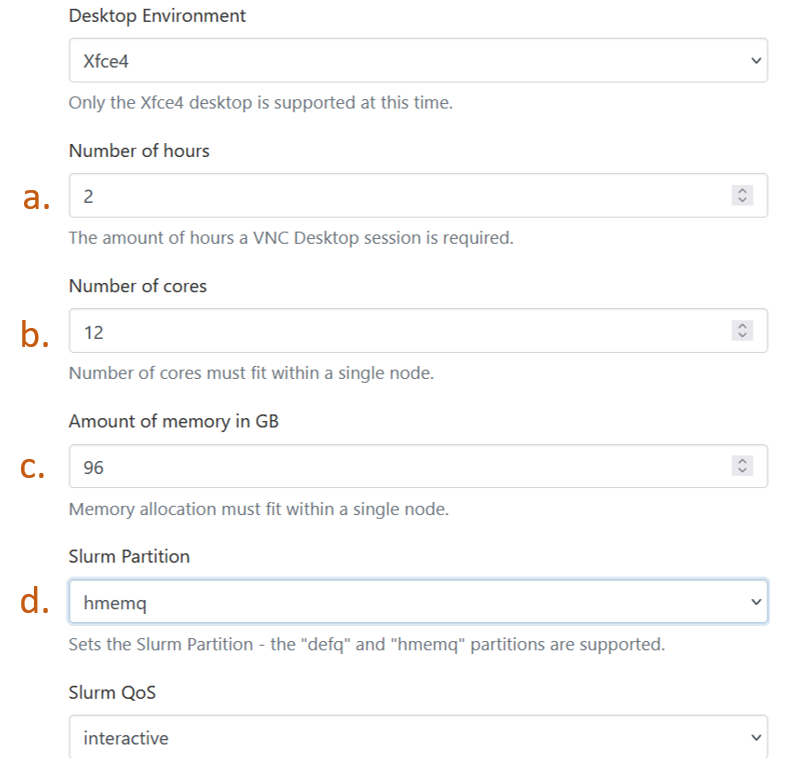
Launch the VNC desktop session by clicking “Launch”.
Once the resource becomes available, click “Launch VNC sessoin”, and you will be taken to a linux based desktop like session, along with an email that your session has started.
Right click anywhere on the desktop screen and click “Open terminal here”. This will open up a shell with your login node visible.
Change to the directory which contains the jupyter-notebook.
Activate the conda environment that contains all the necessary packages for the jupyter-notebook. Use the command
source activate env_namefor activating the conda environment.create a myport variable which the jupyter can listen to.
# export myport variable that can be any number.
# usually a positive integer between 0 to 65000
export myport=10053
Start a jupyter session with the following command,
jupyter-notebook --no-browser --port=$myport --ip='0.0.0.0'
This will give a result something as follows,
[I 2024-03-20 09:57:25.859 ServerApp] Package notebook took 0.0000s to import
[I 2024-03-20 09:57:26.070 ServerApp] Package jupyter_lsp took 0.2106s to import
[W 2024-03-20 09:57:26.070 ServerApp] A `_jupyter_server_extension_points` function was not found in jupyter_lsp. Instead, a `_jupyter_server_extension_paths` function was found and will be used for now. This function name will be deprecated in future releases of Jupyter Server.
[I 2024-03-20 09:57:26.156 ServerApp] Package jupyter_server_terminals took 0.0856s to import
[I 2024-03-20 09:57:26.157 ServerApp] Package jupyterlab took 0.0000s to import
[I 2024-03-20 09:57:26.332 ServerApp] Package notebook_shim took 0.0000s to import
[W 2024-03-20 09:57:26.332 ServerApp] A `_jupyter_server_extension_points` function was not found in notebook_shim. Instead, a `_jupyter_server_extension_paths` function was found and will be used for now. This function name will be deprecated in future releases of Jupyter Server.
[I 2024-03-20 09:57:26.372 ServerApp] jupyter_lsp | extension was successfully linked.
[I 2024-03-20 09:57:26.375 ServerApp] jupyter_server_terminals | extension was successfully linked.
[I 2024-03-20 09:57:26.378 ServerApp] jupyterlab | extension was successfully linked.
[I 2024-03-20 09:57:26.381 ServerApp] notebook | extension was successfully linked.
[I 2024-03-20 09:57:30.086 ServerApp] notebook_shim | extension was successfully linked.
[I 2024-03-20 09:57:30.205 ServerApp] notebook_shim | extension was successfully loaded.
[I 2024-03-20 09:57:30.207 ServerApp] jupyter_lsp | extension was successfully loaded.
[I 2024-03-20 09:57:30.207 ServerApp] jupyter_server_terminals | extension was successfully loaded.
[I 2024-03-20 09:57:30.216 LabApp] JupyterLab extension loaded from /gpfs01/home/uizas3/.conda/envs/juptest/lib/python3.12/site-packages/jupyterlab
[I 2024-03-20 09:57:30.216 LabApp] JupyterLab application directory is /gpfs01/home/uizas3/.conda/envs/juptest/share/jupyter/lab
[I 2024-03-20 09:57:30.216 LabApp] Extension Manager is 'pypi'.
[I 2024-03-20 09:57:30.218 ServerApp] jupyterlab | extension was successfully loaded.
[I 2024-03-20 09:57:30.220 ServerApp] notebook | extension was successfully loaded.
[I 2024-03-20 09:57:30.220 ServerApp] Serving notebooks from local directory: /gpfs01/home/uizas3/cuda-related/juulich/python-hpc
[I 2024-03-20 09:57:30.220 ServerApp] Jupyter Server 2.10.0 is running at:
[I 2024-03-20 09:57:30.220 ServerApp] http://hpclogin01.int.ada.nottingham.ac.uk:12342/tree?token=1fd967b62ecec8ee5458bb14022d4200b1a07c3c6177b129
[I 2024-03-20 09:57:30.220 ServerApp]     http://127.0.0.1:12342/tree?token=1fd967b62ecec8ee5458bb14022d4200b1a07c3c6177b129
[I 2024-03-20 09:57:30.220 ServerApp] Use Control-C to stop this server and shut down all kernels (twice to skip confirmation).
[C 2024-03-20 09:57:30.224 ServerApp]

    To access the server, open this file in a browser:
        file:///gpfs01/home/uizas3/.local/share/jupyter/runtime/jpserver-1632070-open.html
    Or copy and paste one of these URLs:
        http://hpclogin01.int.ada.nottingham.ac.uk:12342/tree?token=1fd967b62ecec8ee5458bb14022d4200b1a07c3c6177b129
        http://127.0.0.1:12342/tree?token=1fd967b62ecec8ee5458bb14022d4200b1a07c3c6177b129
[I 2024-03-20 09:57:30.267 ServerApp] Skipped non-installed server(s): bash-language-server, dockerfile-language-server-nodejs, javascript-typescript-langserver, jedi-language-server, julia-language-server, pyright, python-language-server, python-lsp-server, r-languageserver, sql-language-server, texlab, typescript-language-server, unified-language-server, vscode-css-languageserver-bin, vscode-html-languageserver-bin, vscode-json-languageserver-bin, yaml-language-server
Click/ (or copy) the link that would look something similar to the following
http://127.0.0.1:12342/tree?token=1fd967b62ecec8ee5458bb14022d4200b1a07c3c6177b129
Open the VNC session’s browser, and paste the link in the web address.
This should open the jupyter “Home” directory, which would indicate the jupyter-notebooks present in your chosen directory, from which the command in step 12. was run.
You can now run your python code as done in jupyter notebooks. Make sure to have all the required packages installed before , instead of installing them here.
Note that the above step of running a jupyter-notebook (step 12) is especially not to be done at the home login, as the home login is a shared space for all the ADA users. To do this without the OpenOnDemand, we look at the following with an interactive session.
Using an interactive session#
In this section, one would be able to access a compute node from the web browser of your systems/laptop for your jupyter-notebooks.
Go to the directory in your home directory on ADA which contains a jupyter notebook.
Load anaconda module,
module load anaconda-uoneasy/2023.02.6
Create a conda environement of your required packages here. Refer Create a conda env for how to do this. Make sure the
jupyterpackage is installed in this conda environment.Book an interactive session. This means that you will have an exclusive access to a requested resource for a specified duration of time. Use the following command accordingly,
srun --partition=defq --nodes=1 --mem-384g --time=2:00:00 --pty /bin/bash

# change partition flag to the appropriate partition accordingly.
# Thumb rule for nodes is kept as 1, as going to 2 nodes includes a communication overhead, slowing down computations.
# Thumb rule for mem flag is 4 times the number of cores on that partition for 1 node. Say for example, for defq partition 1 node has 96 cores, so 96 x 4 = 384G. Same applies for other partitions as well, however are slightly different for hmemq partition and the GPU partitions.
# Recommended time is also for 2 hours, however, remember that after this scheduled time, the allocated resource will be closed, which means, any notebook running during that time will also close and will be difficult to recover. Set the time accordingly.
This means that 1 full node with 384G memory (96 cores with 4GB each) is requested for 2 hours time on the defq partition. Once the resource becomes available and you are inside the interactive session, the shell will change to the name of the corresponding compute node, i.e.
$ userid@ hpclogin02 (Ada)

## will change to the booked resources, say copmp004 becomes available.

$ userid @ comp004 (Ada)
This means that you have booked the requested resource exclusively for yourself.
Activate the created environment.
source activate environement_name
Export a myport variable as follows,
# This can be any positive integer between 1024 and 65000
export myport=8891
Use the following tunnelling command that will be used later,
# change hpclogin01 to hpclogin02, if that was your chosen home login.
# myport will be taken from the variable declared in the step above, while
# hostname will be replaced by the booked resource that was allotted during interactive session booking step.

echo "ssh -NL $myport:$(hostname):$myport $USER@hpclogin01.ada.nottingham.ac.uk"

# copy the result of this command somewhere, and will be used later.
Unset the
XDG_RUNTIME_DIRenvironement variable to avoid any permissions issue, with the following command,
export XDG_RUNTIME_DIR=""
Open jupyter session, with the following command,
jupyter-notebook --no-browswer --port=$myport --ip='0.0.0.0'
Note that jupyter-notebook command will only work, if the created environement has the jupyter package. If you have not installed it, then exit the interactive session, go back to the home login, activate the environement, install the jupyter package, and then re-open the interactive session.
Also, it is possible that the selected Linux port 8889 to connect to the notebook is unavailable. If you don’t specify the port, it will default to port 8888 but sometimes this port can be already in use either on the remote machine or the local one (i.e., your laptop). If the port you selected is unavailable, you will get an error message, in which case you should just pick another one. It is best to keep it greater than 1024. Consider starting with 8888 and increment by 1 if it fails, e.g., try 8888, 8889, 8890 and so on. If you are running on a different port then substitute your port number for 8889.
A successful commmand above, will indicate a result like the following,
[I 2024-03-21 11:18:39.450 ServerApp] Package notebook took 0.0000s to import
[I 2024-03-21 11:18:39.459 ServerApp] Package jupyter_lsp took 0.0079s to import
[W 2024-03-21 11:18:39.459 ServerApp] A `_jupyter_server_extension_points` function was not found in jupyter_lsp. Instead, a `_jupyter_server_extension_paths` function was found and will be used for now. This function name will be deprecated in future releases of Jupyter Server.
[I 2024-03-21 11:18:39.462 ServerApp] Package jupyter_server_terminals took 0.0031s to import
[I 2024-03-21 11:18:39.462 ServerApp] Package jupyterlab took 0.0000s to import
[I 2024-03-21 11:18:39.479 ServerApp] Package notebook_shim took 0.0000s to import
[W 2024-03-21 11:18:39.479 ServerApp] A `_jupyter_server_extension_points` function was not found in notebook_shim. Instead, a `_jupyter_server_extension_paths` function was found and will be used for now. This function name will be deprecated in future releases of Jupyter Server.
[I 2024-03-21 11:18:39.480 ServerApp] jupyter_lsp | extension was successfully linked.
[I 2024-03-21 11:18:39.482 ServerApp] jupyter_server_terminals | extension was successfully linked.
[I 2024-03-21 11:18:39.484 ServerApp] jupyterlab | extension was successfully linked.
[I 2024-03-21 11:18:39.486 ServerApp] notebook | extension was successfully linked.
[I 2024-03-21 11:18:39.608 ServerApp] notebook_shim | extension was successfully linked.
[I 2024-03-21 11:18:39.617 ServerApp] notebook_shim | extension was successfully loaded.
[I 2024-03-21 11:18:39.618 ServerApp] jupyter_lsp | extension was successfully loaded.
[I 2024-03-21 11:18:39.619 ServerApp] jupyter_server_terminals | extension was successfully loaded.
[I 2024-03-21 11:18:39.620 LabApp] JupyterLab extension loaded from /gpfs01/home/uizas3/.conda/envs/juptest/lib/python3.12/site-packages/jupyterlab
[I 2024-03-21 11:18:39.620 LabApp] JupyterLab application directory is /gpfs01/home/uizas3/.conda/envs/juptest/share/jupyter/lab
[I 2024-03-21 11:18:39.620 LabApp] Extension Manager is 'pypi'.
[I 2024-03-21 11:18:39.621 ServerApp] jupyterlab | extension was successfully loaded.
[I 2024-03-21 11:18:39.623 ServerApp] notebook | extension was successfully loaded.
[I 2024-03-21 11:18:39.623 ServerApp] Serving notebooks from local directory: /gpfs01/home/uizas3
[I 2024-03-21 11:18:39.623 ServerApp] Jupyter Server 2.10.0 is running at:
[I 2024-03-21 11:18:39.623 ServerApp] http://hmcomp003.int.ada.nottingham.ac.uk:8889/tree?token=c82ffb3d2c9d2b9431cf1288f093ae54ed8afa64c041a11c
[I 2024-03-21 11:18:39.623 ServerApp]     http://127.0.0.1:8889/tree?token=c82ffb3d2c9d2b9431cf1288f093ae54ed8afa64c041a11c
[I 2024-03-21 11:18:39.623 ServerApp] Use Control-C to stop this server and shut down all kernels (twice to skip confirmation).
[C 2024-03-21 11:18:39.625 ServerApp]

    To access the server, open this file in a browser:
        file:///gpfs01/home/uizas3/.local/share/jupyter/runtime/jpserver-336205-open.html
    Or copy and paste one of these URLs:
        http://hmcomp003.int.ada.nottingham.ac.uk:8889/tree?token=c82ffb3d2c9d2b9431cf1288f093ae54ed8afa64c041a11c
        http://127.0.0.1:8889/tree?token=c82ffb3d2c9d2b9431cf1288f093ae54ed8afa64c041a11c
[I 2024-03-21 11:18:39.637 ServerApp] Skipped non-installed server(s): bash-language-server, dockerfile-language-server-nodejs, javascript-typescript-langserver, jedi-language-server, julia-language-server, pyright, python-language-server, python-lsp-server, r-languageserver, sql-language-server, texlab, typescript-language-server, unified-language-server, vscode-css-languageserver-bin, vscode-html-languageserver-bin, vscode-json-languageserver-bin, yaml-language-server
Leave the session running here.
Start another terminal session in your laptop or your system and setup a tunnel using the command obtained in step 6
# for this example say, the myport was 8891, and hmcomp003 was the alloted resource.
# The echo command from step 7 should look something like the following,

ssh -NL 8891:hmcomp003.int.ada.nottingham.ac.uk:8891 uizas3@hpclogin01.ada.nottingham.ac.uk
a password prompt should appear, that on entering the password will not do anything.
After this, go back to the runnning jupyter-session and copy the link that would look something like the following just at the end.
http://127.0.0.1:8889/tree?token=c82ffb3d2c9d2b9431cf1288f093ae54ed8afa64c041a11c
Go to your laptop’s or system’s web browser and paste this link onto it. Your jupyter-notebook session should now be visible from your laptop’s browser.
This simply means that you are able to access the compute node of ADA (or the booked resource from step 3) from your web browser.
Have fun with your work.